Website designers have been swearing at Internet Explorer v6 for many years. Now, Microsoft themselves have said enough is enough and are trying to encourage IE6 users to upgrade. There are some alternative ways to advise your website visitors to upgrade though.
This week Microsoft launched The Internet Explorer 6 Countdown to try and encourage users of their old Internet Explorer 6 product to upgrade to a newer version. This idea is nothing new. With many sites such as YouTube, Google & Facebook already officially not supporting IE6 a number of sites already include a notification to IE6 users.
I tend to think that any people still using IE6 do not have the ability to upgrade their own machine. It may be locked down by the IT department or even a machine setup for a technophobe by another family member. Whatever the reason I do agree that they should be alerted to the issue but if you are changing your browser. Why not change it to something other than IE. Give the user the choice to use any browser. That is the whole point of the web and web standards.
So, here is my rundown of IE6 browser alerts for your website…
The banner is only shown in English as a picture (not good for accessability) and only redirects to Microsoft’s site for users to download IE9. The code is pulled from Microsoft’s website each time which means they control the banner.
A very cheeky little banner site that makes it look like the upgrade from IE6 to IE9 is a security upgrade! The big advantage of this is that you can download and install the code on your site. Quicker for site visitors and more secure.
A very nicely put together banner which is only let down by being old and still recommending the user upgrade to IE7! While IE is recommended first the banner also suggests other browsers such as Opera, Firefox, Safari or Chrome. The site does allow you to download the code yourself too and I’m sure you can change the references of IE7 to IE9
Multi language, multi browser recommendation and a nice landing page that explains to visitors why they should be upgrading. Only negative point is the banner is called from an obfuscated JavaScript file on a their website which some may see as a security issue.
My recommendation and the one I’ll be implementing on my sites. Used by a number of large sites already , the code is longer but only pulls images from it’s own server which you can easily copy to your site.
Whatever you choose lets all hope that IE6 dies soon!
The weekend of 18-19th September 2010 saw PayPal open their doors to a bunch of developers for Charity Hack 2010. With the combination of API’s from JustGiving, PayPal and MissionFish the idea was to create something in 24 hours for charity or a good cause.
After much deliberation the week before over what to build (I really wanted to make a Blue Peter style totaliser using an Arduino but I couldn’t get the equipment there and was worried about setting the fire alarms off with the soldering iron) I decided to play safe and fix a real world problem I had.
As I am sure you are all aware I organise the Goodwood Roller Marathon each year and raise lots of money for charity. While I have managed to automate a lot of the administration, the collecting and tallying up of sponsorship is a huge admin task, especially after the event when we are all tired. The annoying part is that we send a lot of our users to Justgiving to create their pages but have no way of knowing which page they registered and so no way of tracking how much money our event has been responsible for raising!
The solution seemed simple. If we could use the JustGiving API’s to help the user create a sponsorship page then we should get a notification of that page. If we keep a table of these pages we can check them regularly and keep an up to date total of all the money our event has raised.
After a few shout out’s on the event twitter wall I was introduced to Nathan O’Hanlon & Justen Doherty, two PHP developers that were looking for a project. We all talked to the lovely David Whitney from JustGiving who hinted that this sort of functionality was already in the pipeline but was never finished so we decided to show them how it should be done :-p
I’m sure I could bore you all silly with the rabbit holes we went down over the 24 hours but things are never as easy as you think, especially when you are coding fast and even more so when you haven’t had much sleep. Nathan & Justen decided on the symfony framework and set to creating a GIT repo while I went off to register aggreg8.me and create the webspace.
There were many questions about the JustGiving API which David helped with. Lets just say the API had a few bugs too although a lot of the bugs were fixed in the same 24 hours. Annoyingly the API allowed for all donation pages to have an Event ID however there was no way of finding out what a valid event ID was let along then searching for them and indexing them! I really didn’t want to have to replicate the pages that JustGiving already had using the API but it seemed there was no choice. By the time night came we hadn’t done much coding but had a good idea of the direction. Nathan & Justen went home for the night and I stayed up designing the front end to the website.
I was disappointed not to be building anything with Arduino but had bought it along with the old BiscuitTrain rig. As it was night time and I wasn’t going to use it now I donated it to a fellow charity hacker who made Wreck it or not! (picture) People donating money would choose to make the train go faster or slower until it crashed. I’m glad it got used 🙂
Morning comes after a quick nap and Nathan returns for the day. Justen has been up all night coding at home so is now going to bed. We quickly add my front end to the project but now comes the integration which takes ages and all the way up to the 13:30 deadline.
After another food break (many have said it, we really were fed well) we all did our 3 min presentation. I kinda rushed it but I think I got our point across. The great news is that the program manager for JustGiving came to us at the end to say that he would like to talk about the project in the future. I really hope they do contact me and listen to my calls for help, I really do think it will make their platform stronger and better… plus I have VirginMoneyGiving already contacting me and asking what I would like :-p
(Loads of people took pictures of the event including pics of me but it seems very few made it online)
In all the event was a brilliant first hack day for me and a got a lot out of it. Our project http://www.aggreg8.me/ is now live and while it’s not using the live API’s yet (as JustGiving haven’t officially launched them yet) Nathan has been doing lots of work in the days after the event to make sure it’s a strong and stable product that fully works. It’ll be interesting to see what JustGiving do next, I will be sure to update you all.
A huge thank you again to Nathan & Justen for all their help and to everyone else for a fantastic 24 hours 🙂
In February 2010 I was asked if I knew of a way to throw wet sponges at someone when they donated money on the internet… A few weeks later I found myself in the back garden of a house with a hand built catapult, lot of wires and enough wet sponges to make It’s a Knockout jealous. Here’s what happened and how I made it work…
The Brief
The original brief was set by Claire Thompson as a fund-raising idea for Twestival UK. I think she wanted a simple screen display that would show when someone donated or tweeted a donation so that a wet sponge could then be launched at her in some stocks while the whole things was streamed online. I of course ran with this idea and by the time she had finished talking had proposed a sponge throwing catapult and automated launch mechanism that would fire automatically when someone donated.
The Build – Catapult
The catapult itself wasn’t that hard to build. With a huge amount of help from my father and my parents garage we made it up as we went along.
Items Used
2 x 4m lengths of 25x50mm externally treated wood (cut into 4 x 2m lengths to fit in my car)
A garden gate hinge
Something heavy (we used a large block of aluminium that we’ve had in the garage for years)
A 5 litre container cut open to hold the wet sponges
2 bolts to hold on the heavy block
A pile of wood screws
Construction took us an afternoon. I knew that a trebuchet would throw the sponges further but that they are also harder to setup and fire accurately so we settled on a classic catapult design, it only needed to last one day. We built the square frame first, then the middle bar and swinging arm before adding legs and weight.
After a few test fires in the garden it worked straight away but was obvious that it would have to be pegged down to be used. We could have made the legs bigger but we wanted to be able to get it in the boot of my car without disassembly!
The Build – Firing Mechanism
As is always the way, the hardware is the easy part, the software is the hard part! Having recently discovered the Arduino and itching to play around with the concept I started coding up something that fitted the bill. I won’t bore you with all the dead ends I went down however I did need to adjust the initial brief a little.
The idea was to make the Arduino completely self running and getting it updates via the Ethernet Shield. What is the point of having an Arduino connected to a computer, you may as well programme the computer to do the same job. Having said that, I was running out of time and I realised that some people had already donated money to the cause. People that had already donated were due a sponge throw so while the system had to be automated it needed a way of manually adding launches.
Getting the Arduino to connected to the internet wasn’t too hard however I would be using this in a strangers back garden with no way of knowing how they connected to the internet. I decided to use the excellent DHCP and DNS library’s from Georg Kaindl which once set up saved me huge amounts of time debugging problems.
I also wanted a way of thanking the users that donated so used a serial enabled LCD screen to display where the donation had come from. This also proved very useful when it came to debugging as the serial console takes a long time to start on my computer (damn you Java). Using the LCD screen meant I could display debug information about the DHCP lease or status of the program without having to connect a computer.
The final part of the puzzle was the release mechanism. I used the servo and some gate hooks/eyes to create a firing pin which you should be able to see on the video below.
The program was originally setup to search twitter for keywords and while I could make it work I couldn’t guarantee that tweets wouldn’t be missed. I wanted to tie it into PayPal or another payment system but time was running out and I didn’t have any of the charity account details. So, I decided to cheat :-p
So that I could control the catapult remotely I decided to use the excellent txtlocal service which gives a free API for incoming SMS (and very good rates on outgoing ones too). This meant that I could send a text message from my phone and fire the catapult while displaying any message I like on the LCD screen. This was also a hack so that I can rate limit the firing and not miss any donations but it worked well!
The Results
On the day there were a few problems. The catapult was connected to the internet and worked perfectly! We did loads of test fires and there was no problems at all. Then we launched Ustream, and everything stopped. Ustream worked fine, the catapult worked fine, but the two together wouldn’t work at all. My hunch is that Ustream data was flooding the Ethernet shield and blocked all communication. After much cobbling we got things working enough to throw wet sponges and much fun was had by all.
Final Notes
Seeing as this entire project was done in a few weeks in spare time I think it went quite well. I have missed out a lot of my trial and error but please feel free to post questions in the comments and I’ll attempt to answer.
Some things stay with you forever and I would like to think that the following little poem helped shape me. You see, the first computer I ever played with was the family Archimedes 310 and way before I had ever even heard the term “hacking” I was poking around in some of the library files trying to see how things worked. One of the first library files I looked at contained the following poem stuck in the middle of the code! I still don’t know who wrote it so I’m going to credit the author of the library. Surprisingly I can’t find this poem anywhere on the internet!
Silicon valleys,
Germanium hills,
Digital journeys,
And virtual thrills.
Greetings, O hacker,
Feeling unwell?
Microchip tracker,
Welcome to hell.
I have just finished spending this weekend completely replacing my backup process. Seeing as a few people have asked and it’s all fresh in my head I’ll try and write down some key lessons/decisions I came across along the way… OK, OK, I want to show off a bit too :-p
I have a lot of very old boxes at home so the brief was to build a system that I could use as a web & mail server at home (I have pro hosting out on the internet for big projects), a file server (NAS) for home machines, a music server for home entertainment and a backup server to back up *all* my machines. I decided on an AMD 64 with 4 x 400GB SATA drives and an Adaptec hardware RAID controller set up as RAID 5. I chose CentOS for the OS and the now opensource cobalt GUI for mail & web (for those of you that don’t know there is a very nice combined installer). A combination of Ampache and mt-daapd work brilliantly as music servers.
But anyway, back to the backups!
I tried very hard to find an off the shelf package that was cheap/free but failed to find one that ticked all the boxes. In the end I picked rsync as my backup tool of choice and decided to roll my own, here is why…
Firstly rsync means that only data that has changed since the last backup will be transferred, this means it’s a lot quicker to backup an entire server both on the CPU and bandwidth. By shell scripting it I can make my backups do exactly what, my scripts are now over 700 lines but they do do exactly what I want and can easily force an extra backup of one or all machines at any time.
Using SSH (–rsh=ssh option) all communication between the backup server and the server being backed up can be done securely without opening any extra insecure ports on each system to be backed up.
SSH can also be used to automatically (and securely) log on to the remote system and run a system specific pre-backup script, I use this to do such things as export any MySQL databases so they can be imported back in instead of having to recover DB files.
The most powerful option is –link-dest which allows you to hard link unchanged files to a previous backup. This saves HUGE amounts of space on the backup server. e.g. I backup a machine (Fred), Fred has a 20GB HD and I back up/copy the entire drive excluding /proc and /dev. I now have a 20GB directory on my backup server. The next day I backup Fred again and –link-dest to yesterdays backup. Rsync compares the remote files with the local copy and if exactly the same will not bother transferring them but will hard link the new file to yesterdays file. Any files that have changed are copied down a fresh (or partially copied using yesterdays backup if possible). If only 100MB of files of changed since yesterday I now have two directories both with 20GB of files but only taking up 20.1Gb of space on the backup server!
My new backup scripts now do this every day and then have a script that keeps every days backups for a month, one backup a week for the previous month and one backup a month previous to that. Hopefully this means that I can recall previous work I have done and all while saving huge amounts of space.
While –link-dest is the most powerful option -n is definitely my favourite. A while ago I was in the unfortunate situation of having one of my internet hosting servers hacked. As I am sure you are aware when this happens you can trust NOTHING on the server, any binary could have been changed including ls & ps. By running a backup of the server but adding the -n option the backup did not back anything up but could show me every file that had changed since the last backup no matter how small the change. Very powerful when trying to find out what happened.
Other options I should mention are –bwlimit which is useful for backing up a live server over the internet and not maxing things out. -z which compresses the data and makes backing up even quicker. -a –numeric-ids good for backup.
Net result, I do full backups of 8 machines each night while only transferring files that have changed and have full backups going back for as long as I want.
Ooooo, I wrote a lot! Sorry about that. I hope it’s of use to people!
In the same vein my last post, here is page on installing chkrootkit and Rootkit Hunter on CentOS / BlueQuartz.
A root kit is the name given to a piece of software written to try and elevate someone’s permissions to root level, commonly used by hackers/crackers/script kiddies to infect a system. There are many rootkit checkers however we are going to install two of the most common which are both are free and open source. Some people prefer one over the other, I say, why not use both!
# Pick a location
cd /usr/local
wget ftp://ftp.pangeia.com.br/pub/seg/pac/chkrootkit.tar.gz
tar zxvf chkrootkit.tar.gz
rm chkrootkit.tar.gz
# Fix the permissions
chown -R root:root chkrootkit-0.47
cd chkrootkit-0.47
make sense
# A quick tidy up
mkdir docs src
mv *.c Makefile src
mv READM* chkrootkit.lsm ACKNOWLEDGMENTS COPYRIGHT docs
./chkrootkit -q > good.output 2>&1
# CHECK THE good.output FILE IS OK AND HAS A KNOWN GOOD OUTPUT
touch current.output
touch /etc/cron.daily/chkrootkit
chmod 755 /etc/cron.daily/chkrootkit
vi /etc/cron.daily/chkrootkit
# Place the following text in the file...

#!/bin/sh
SERVER=`hostname`
cd /usr/local/chkrootkit-0.47
rm current.output
./chkrootkit -q > current.output 2>&1
DIFF=`/usr/bin/diff current.output good.output`
ERRO=`/bin/cat current.output`
if [ "$DIFF" != "" ]
then
/usr/lib/sendmail -t << EOF
To: root
Subject: ${SERVER}: Chkrootkit Output
====> A diff between current and good output is:
$DIFF
====> The current output is:
$ERRO
EOF
fi
Rootkit Hunter
The website is http://www.rootkit.nl/projects/rootkit_hunter.htmlhttp://rkhunter.sourceforge.net/ and the following is based on v1.2.8
# Use a working directory where you can execute code
cd /home/.tmp
wget http://downloads.rootkit.nl/rkhunter-1.2.8.tar.gz
tar zxvf rkhunter-1.2.8.tar.gz
cd rkhunter
./installer.sh
cd ..
rm -r rkhunter rkhunter-1.2.8.tar.gz
# Rootkit Hunter does however complain about the user root-admin.
# As far as I can tell there is no need for this user on BQ so I remove it.
userdel root-admin
touch /etc/cron.daily/rkhunter
chmod 755 /etc/cron.daily/rkhunter
vi /etc/cron.daily/rkhunter
# Place the following text in the file...

#!/bin/sh
SERVER=`hostname`
OUTPUT=`/usr/local/bin/rkhunter --versioncheck`
EXITCODE=$?
if [ ${EXITCODE} != 0 ]
then
echo "${OUTPUT}" | /bin/mail -s "${SERVER}: Rootkit Hunter Output" root
fi
OUTPUT=`/usr/local/bin/rkhunter --update`
EXITCODE=$?
if [ ${EXITCODE} != 0 ]
then
echo "${OUTPUT}" | /bin/mail -s "${SERVER}: Rootkit Hunter Output" root
fi
OUTPUT=`/usr/local/bin/rkhunter --cronjob --report-warnings-only`
EXITCODE=$?
if [ ${EXITCODE} != 0 ]
then
echo "${OUTPUT}" | /bin/mail -s "${SERVER}: Rootkit Hunter Output" root
fi
After just rebuilding a BlueQuartz box I thought I would copy my install notes. This is an entirely personal list of things that I do to a vanilla install of CentOS/BlueQuartz. I thought it may be useful to other people.
Contents
Change root passwords
Secure SSH
Apache Obscurity
Install ImageMagick
PHP upload settings
Add Mime Types
yum checker
Setup floppy drive
Majordomo logfile
Change root password
BQ is initially set with no root MySQL password and the systems root password is set the same as the admin user. These should be changed to something different!
Change MySQL password wth `/usr/bin/mysqladmin –user=root password NEW_PASSWORD`
Change root password with `passwd`
Secure SSH
SSH is obviously better than telnet but did you know that the SSH protocol v1 has been cracked for quite some time now. I lock all my boxes down to only use protocol v2 and haven’t had any come back on compatability issues.
Modify `/etc/ssh/sshd_config` to set `Protocol 2`
Run `/etc/rc.d/init.d/sshd reload`
Apache Obscurity
Yes, this is security through obscurity but everything helps. The following will remove the “signature” at the bottom of pages generated by Apache and will also only report the webserver as “Apache” instaed of the full version number and OS
Modify (and add if necessary) the following lines in `/etc/httpd/conf/httpd.conf` & `/etc/admserv/conf/httpd.conf`
ServerSignature Off
ServerTokens Prod
Run `/etc/rc.d/init.d/httpd reload`
Run `/etc/rc.d/init.d/admserv reload`
Install ImageMagick
A must for most hosting nowadays. Simply run `yum install ImageMagick ImageMagick-perl` as root.
PHP upload settings
In this new broadband age people are uploading pictures and such to their sites so I change the PHP upload defaults. Change lines in /etc/php.ini (or your own php.ini) and run `/etc/rc.d/init.d/httpd reload`
post_max_size = 20M
upload_max_filesize = 10M
Add Mime Types
There seem to be some common mime types missing from the default install. Add the following to `/etc/mime.types` and run `/etc/rc.d/init.d/httpd reload`
Now I love the Nuonce/Solarspeed automatic yum installer however I like to install patches on systems when I am there, that way if there are any problems I can fix them straight away. I have this little script that mails me when there are packages to install.
touch /etc/cron.daily/yum-check
chmod 755 /etc/cron.daily/yum-check
vi /etc/cron.daily/yum-check
 #!/bin/sh
SERVER=`hostname`
OUTPUT=`/usr/bin/yum check-update`
EXITCODE=$?
if [ ${EXITCODE} != 0 ]
then
echo "${OUTPUT}" | /bin/mail -s "${SERVER}: Yum Updater" root
fi
Setup floppy drive
If your system has a floppy disc drive you won’t be able to use it until you run `floppy –createrc > /etc/floppy`
Majordomo logfile
I know it’s silly but I like all my log files to be in one place….
As you may have seen I have written my own server query script for my Unreal Tournament Server mainly because I wanted to learn how to code UDP packets in Perl. However, when the script was finished I wanted a good picture of each map to show which map was currently playing so, to cut a long story short, after much messing around I created animated GIF’s for all the maps that that I used using the screenshot images from the maps themselves.
I figure that these pictures may be of use to other people with server query scripts so I am making them available for people to use, all I would ask for is a link back to my page somewhere on your site (it’s not much to ask for). This thing has now ended up so huge and I have created 629 map pictures for UT2003 and now UT2004.
How to use
There are two ways to use these images, you can either download them and put them on your server for your script to use or you can call the images from my site. There are advantages and disadvantages to both…
You will have to script what happens if the map picture doesn’t exist. If requesting the image from my server and the map GIF doesn’t exist the Unreal logo will be sent automatically.
You will have to make sure the script that calls to the images are done in lower case. Requests to my server can be made in any case ( dom-aphrodite, DOM-Aphrodite, DoM-aPHroDitE, etc.) and will return the correct image.
Uses YOUR disk space and bandwidth compared to using MY disk space and bandwidth.
Download the map pictures for your site – utmaps.zip (44MB)
…and please remember to link back to my site, I don’t ask much.
Link to the images on my site.
This is easily done…
Prepend “https://www.dogsbody.org/utmaps/” to the beginning of the map file name.
Append “.gif” to the end of the map file name.
Call this URL as part of an image tag in your script.
All GIF’s have a width of 256 and a hight of 128, if you specify this in your image tag the image will load faster.
If your script calls a map that doesn’t exist the Unreal logo will be returned.
Examples of the GIF’s
Adding to the collection
I’m afraid I am no longer creating these map pictures.
Thanks
I owe a big thank you to Lance (Throckmorton) and Konstantin (Inf*klarissa_(rus)) who have both created a bumber of new map pics that were perfect for the collection.
Feedback
If you have any questions or problem with these GIF’s then please don’t hesitate to contact me.
I would also love to hear any comments you have, good or bad.
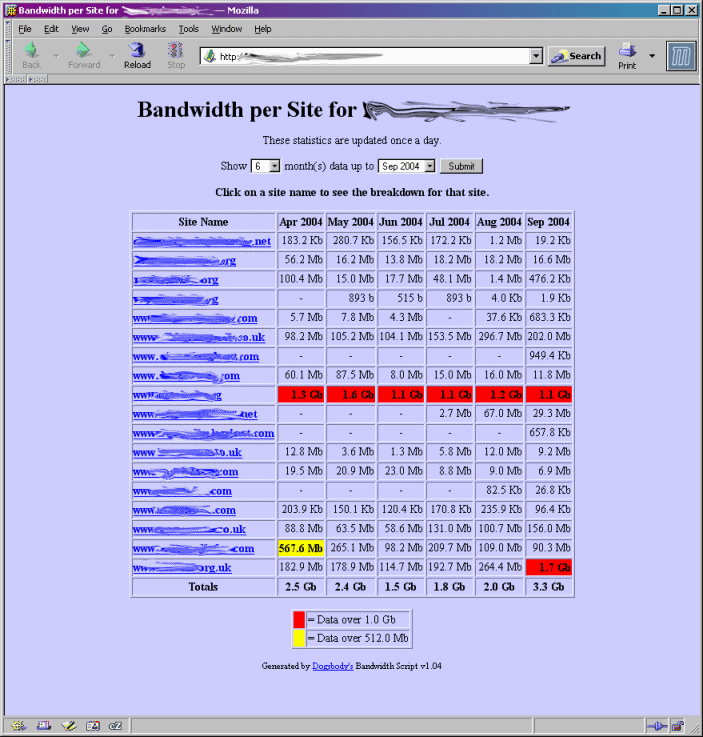
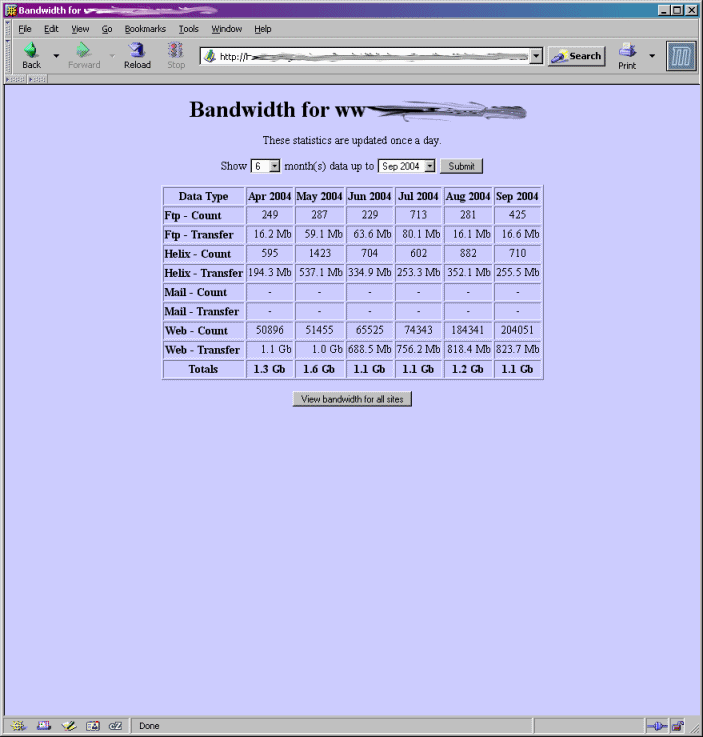
This script is for the Cobalt Raq4 (although I would love to know if it works with the Raq3 too??). It uses the internally generated /home/.cobalt/report/stats.tab file to display the bandwith used by each virtual site on the server even if your virtual sites are on the same IP address. The stats.tab file is generated by the Raq when it splits the log files up for each site. A total is kept for Web, FTP & E-mail by month showing the number of hits, transfers & mails as well as the total amount of bandwidth used for each one. This script displays that data with some nifty additions…
What it does
At it’s basic level this script displays the data in the stats.tab file in a webpage but it also…
The script is password protected by default. If “admin” logs in they will see a summary for all sites. If a standard user logs in they will only see details of their own site. This means you can publish the URL and siteadmins can check their own sites usage.
Add extra data to the stats. e.g. I run a Helix streaming server and split the logs in the same way to create my own stats.tab file for helix. This script will merge data from both.
Two warning levels. If the usage for a site is over a two bandwidth levels it will be highlighted. These levels can be configured by you.


